
![]()

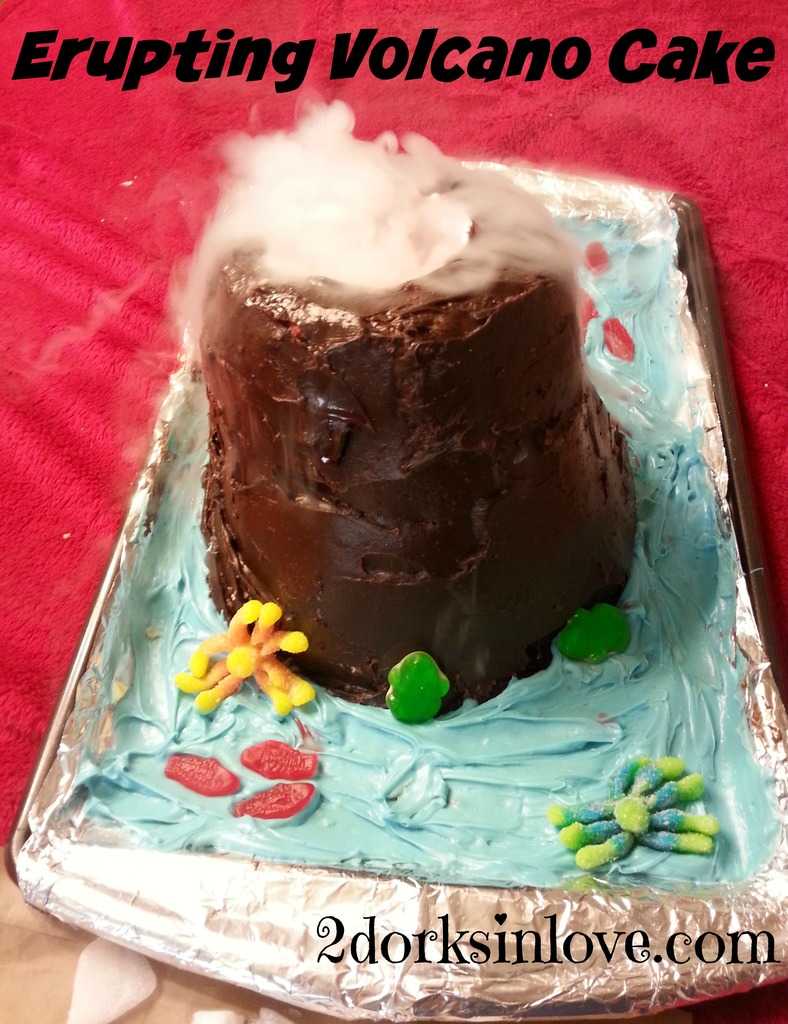
I started making this easy erupting volcano cake years ago to amuse my friends and have fun at parties. There is no baking involved (unless you prefer to make your own angel food cakes) and kids especially enjoy it.
The Science Behind the Erupting Volcano Cake:
The trick to making this cake go off is (carefully!) combining dry ice (carbon dioxide) with hot gelatin. Dry ice is unusual in that it sublimates. Many substances go through three phases: solid, liquid and gas. Dry ice skips the liquid state and goes straight from a solid to a gas. When you add the dry ice to hot gelatin, it heats it up and sublimates quickly, producing fog in the process. As Appalachian State University mentions,
“The fog that seems to be coming off a block of dry ice is actually not the carbon dioxide itself but rather water vapor from the air, condensing due to the cooling effect of the carbon dioxide. This effect is especially pronounced in the moist air above a warm container of water; thus, putting dry ice in warm water not only accelerates its sublimation but creates a lot of fog.”
Pretty cool, eh? Let’s get into how to easily make your own erupting volcano cake.
Warning: Use proper precautions when handling dry ice to avoid injury. Wear gloves and use tongs. Also, do not eat gelatin in the cup as I find that there are still bits of dry ice for a while.

Ingredients:
- 2 Angel food Bundt cakes (you can make your own if you like, but I just grab a couple from the store bakery to make it simple)
- 2 cans of chocolate frosting
- 1 small block of dry ice (about .5-1 pound will do)
- 1 box red gelatin (flavor of your choice)
- 2 cups hot water
- (Optional) Animal cookies or crackers
- (Optional) 1 can of white frosting
- (Optional) Blue food coloring
- (Optional) Sea life gummies like Swedish fish, octopi and frogs
Supplies:
- Cookie sheet
- Gloves
- Hammer
- Tongs
- Bread knife
- Butter knife
- Aluminum foil
- Spoon
- Bowl
Step 1: Line Cookie Sheet and Assemble Cakes

Use the aluminum foil to cover the cookie sheet. That will help keep the mess down and give you a nice base if you decide to add water. Remove the first cake and place it upside down on the foil (wider side down). Place the other cake on top in a similar fashion.
Step 2: Trim the Cakes into a Cone

Next, use the bread knife to start trimming down the top cake so that it forms more of a cone shape. Take off a bit at a time and make sure that you leave the edge around the center hole intact. Gently brush off crumbs. Don’t worry too much if it doesn’t cut perfectly as you can fix it with icing 🙂
Step 3: Add in the Plastic Cup

Carefully push a plastic cup into the top with a screwing motion. This will hold your hot red gelatin for the coming eruption. Don’t use a cup with a wider brim since narrower ones will help force the liquid upward faster.
Step 4: Frost Away!
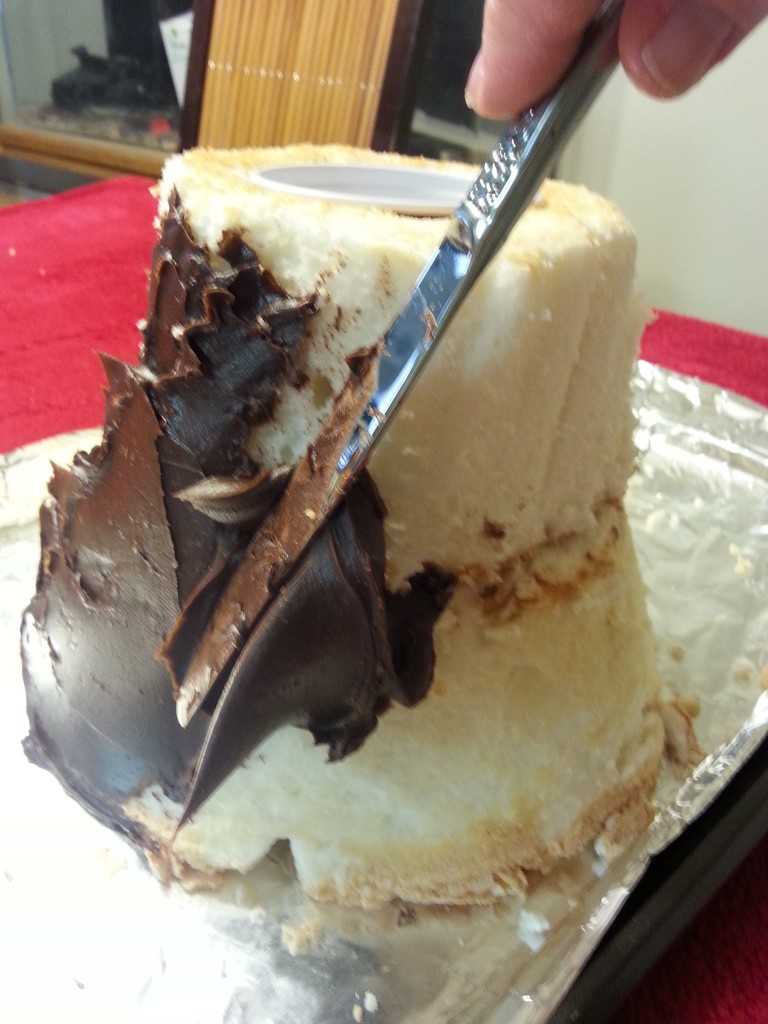
Frost the sides of the cake with the chocolate frosting. I like to put on a lot in one spot to help cover the crumbs easier. If any get stuck on top, go over it with the knife again and they should get mixed in. The frosting also sometimes wants to come back off the angel food as you frost. Do not despair. Smooth it out and keep going. You should be able to cover it evenly to create the cone shaped volcano.
Optional But Fun: Decorate the Cookie Sheet

I don’t do this every time I make this cake, but it’s fun to add more decorations to the scene. Mix blue food coloring a few drops at a time into white frosting until it’s the shade that you want. Spread over the foil. Add sea critters; in this scene, there are Swedish fish, Haribo frogs and Trolli Sour Brite Octupus. If you are feeling saucy, you can add animal crackers to the side. I miss the dinosaur cookies that I used to be able to buy, since they seemed apt.
Step 5: Mix Up Gelatin and Add to Cup
Warm up 2 cups of water until it is hot, but not boiling. Add to your gelatin powder. You do not need to add cold water as mentioned on the package. Pour into the cup until it is about .5″ from the top. You want to leave room to add in the dry ice.
Step 6: Break Up Dry Ice

Be safe! Put on gloves for this part and use tongs to move it around since dry ice is incredibly cold (-109.3F!) and can burn if it touches your skin. Even if you get a small amount from the store, the chunks are usually too big. We want them to fit in nicely into the cup and be able to add more to keep the reaction going. You only need to gently tap the dry ice with a hammer to get it to break apart.
Step 6: Gather Everyone Around and Have Fun!

Use the tongs to add a chunk of dry ice to the gelatin in the cup. The reaction will start to produce fog that will roll over the sides. The gelatin will bubble up until it runs over the side and “erupts”. You can keep adding little chunks of dry ice until the gelatin sets up a bit. If you like, you could carefully remove and discard the gelatin in the cup (put in the sink) and add more to start again.
Warning: Do not eat the gelatin from the cup since it often contains bits of dry ice for a while.
Here’s a version that I did many years ago. Narration and editing by one of my favorite families.
Now it’s time for you to share any fun geeky educational posts that you have made! Add them to the Linky below.


Meagan from More Than A Coupon Queen
Jess from Benoit Academy
Andrea from Waldorf Salad & Cottage Fries
Kassondra from Motherhood Community
Nessa from 2 Dorks In Love


This would be perfect for my Pompeii obsessed son! Thanks for sharing!
I hope he gets to go see that area someday.
We have some of those make your own volcano kits and I thought those were cool. But a cake that is also a science experiment? Awesome! I can’t wait to show this to my girls. They love all things science and will want to do this over the weekend.
Yeah, the edible factor is a plus for me. I have seen some volcano cakes use raw egg, if I remember, and that just seemed to defeat the point of being able to consume it after.
You make this look so easy! I love the video. I’ll have to give this a try.
Can I come see if you do? 🙂
Nessa this is such a great idea!! My boys would love it… I love your tutorial too!
Thanks, I hope they really enjoy it.
Coolest birthday cake ever.
Ha I was offering to do one for my friend’s baby’s party just to have an excuse to do one.
This is so neat! I’m going to have to make this with my daughters. I know they’ll love it!
That should be a lot of fun.
I love this idea! Can’t wait for an excuse to make it. Thanks for sharing!
Hope it’s a blast!
Pingback: Erupting Volcano Cake..Educational Link-Up |
This is sooo cool!! Thanks for sharing this with us!!
Glad you like it. I have a lot of fun with it 🙂
Now, wouldn’t that earn you “Coolest mom of the year” points with any boy! LOL I’m kind of scared of dried ice, though. Where would you get it?
Hehe works for this girl too, but I’m a dork. I’m not sure about Canada (judging by the end of your URL), but I get mine at the regular grocery store. Just use gloves and tongs (and don’t store in your freezer! – too cold) and it will be ok.
Pingback: My Top 5 Favorite Geeky Educational Link Ups |
Wow, this is one exciting cake! It would be so cool for a dinosaur birthday party!
That’s an epic homemade birthday cake for kids that love dinosaurs and the like!
Woah this is too cool. What an epic birthday cake. I know 2 boys that would kill for a cake like this. Love it
Oh my goodness, this is fantastic. My son will be six in a few weeks and we might have to give this a go.
Oh, my goodness! My girls would go crazy for that cake! So fun!
Hey this volcano cake looks awesome & so realistic.
What a completely awesome reason to make a cake! My kids would absolutely love this.
This would be so fun for a Halloween Party! Thanks for including the science behind it. Will definitely be sharing!!
You can’t beat this. Cake and science. My boys would absolutely love doing this!!!
Kitchen science is my favorite!
This is an awesome cake! I have to try some time. My boy will love it.
Volcanoes are always fun for kids. And one you can eat? That makes it ten times more fun. Lovve this volcano cake idea.
An erupting cake volcano!! My kids would go bonkers for this!
My boys enjoy creating volcanoes with baking soda and vinegar so I know that would absolutely love this cake. It looks fantastic!
Oh my gosh! I totally think kids should eat cake in science class when they learn about geology/volcanoes! This is amazing!
My son would go nuts over this! He loves loves loves Earth Science, especially volcanoes. We may try this!
Oh how cool is this?! Who wouldn’t want an erupting volcano cake?!
I wanted to make such cake but ended up not finding dry ice. I tried many options with lemon juice and bicarb but tasted horrible untill I found the easiest option :
– tape 2 straws together (to be long enough) and at the end you tape a balloon which you blow up as much as possible just before serving and you lock the balloon with a clip to avoid the air to get out.
– lava = molten marshmallow with some water and color. This makes a really nice consistancy and the good thing is it tastes nice and sticks on the cake while running out of the crater. Add the hot molten marshmallow in the glass in the middle of the cake and cover (to hide the crater) with paper and some chocolate cream to make the paper disappear. Leave a tiny hole on the side of the paper in order to be able to enter the straw into the crater. The cake looks like a simple mountain, and you get some minutes of surprise on your childs face (why a mountain cake???).
– Then put the straw in, remove the clip you used to lock the balloon and push it down to the bottom of the crater. The bubbling air pushing out the molten marshmallow gives a perfect volcano effect !!!
So simple but I only thought of it at 5AM after a bad night and long evening trying out sooooo many other bicarb-lemon options !